Monday, August 19, 2013

July 2013


July  2013


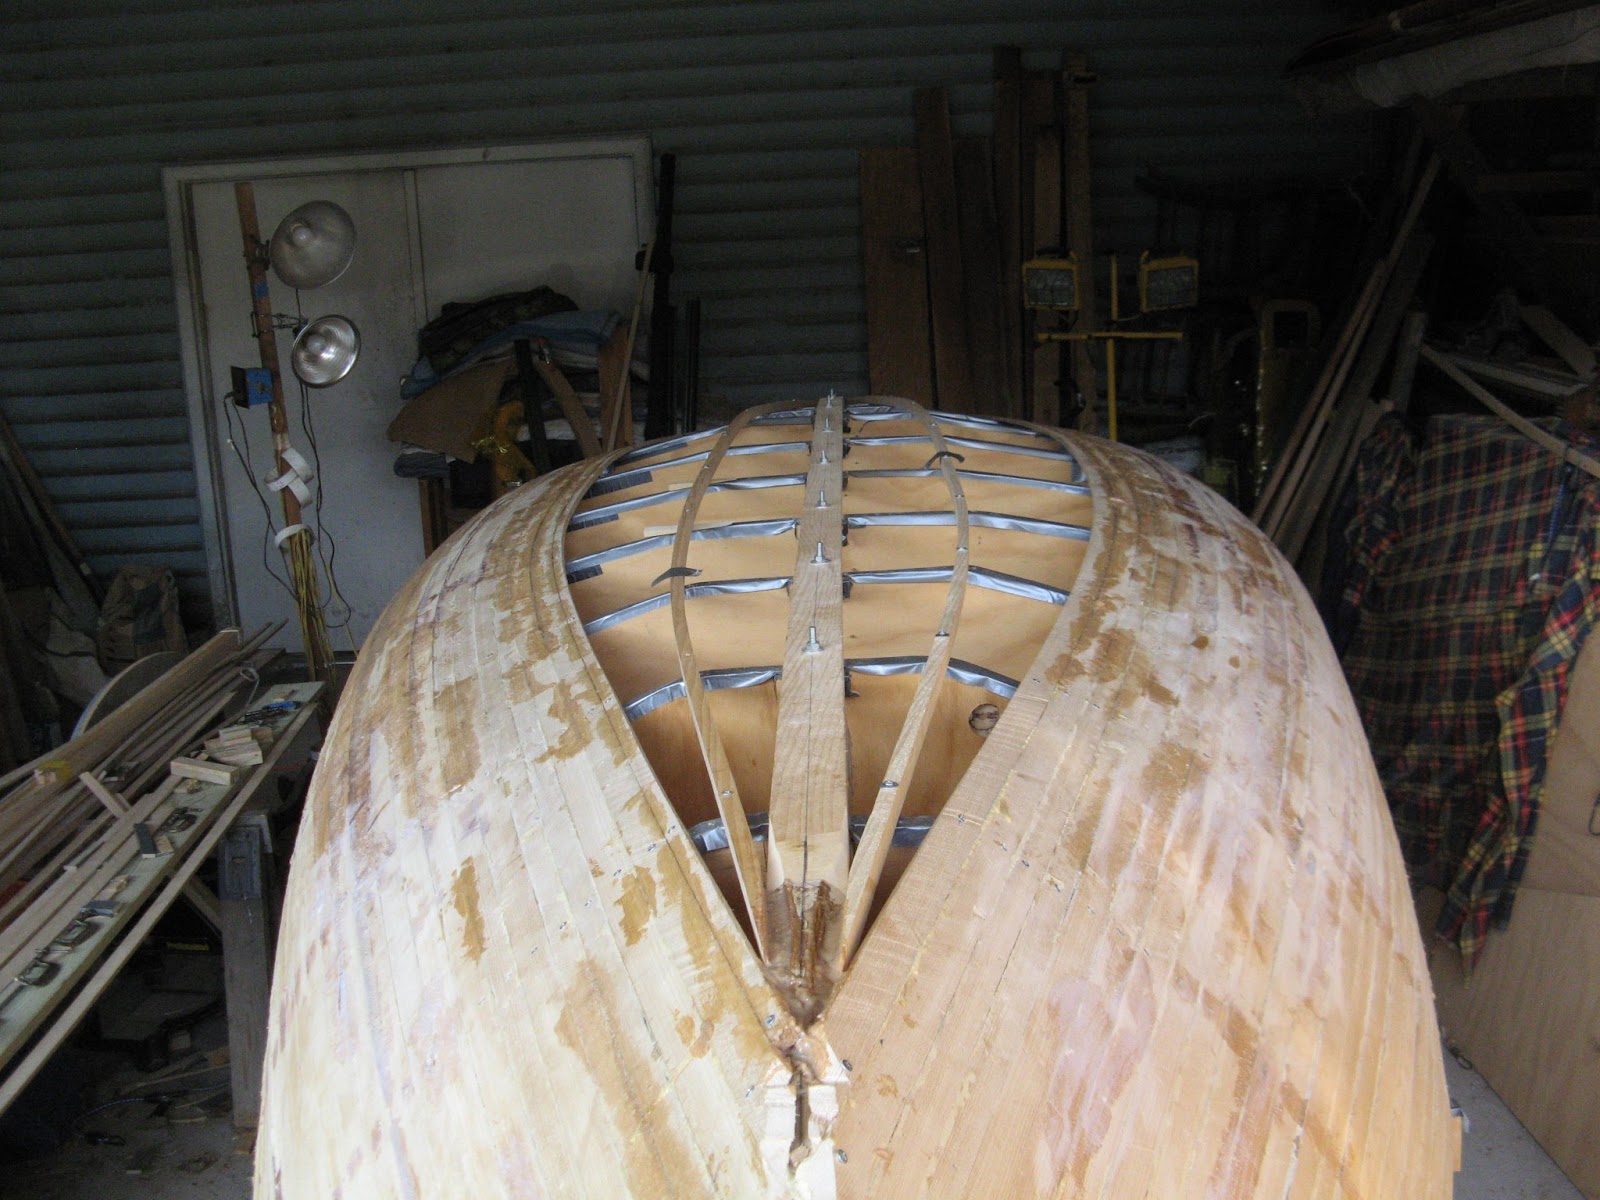
Today, July 3rd I started the arduous process of removing all the foamed spongy gorilla glue that I had used to temporarily hold the strips together. I used a very sharp #2 gouge to slice off the foamed glue and it came off quite easily. Once all the foamed glue is removed it will be time to sand the inside of the hull to remove all traces of the glue and to assist in leveling the inside surface. All voids will be filled with thickened epoxy to both tighten the hull and form a uniform smooth surface.  Today, July 21, 2013 I sanded the interior to the hull with my 6 inch sander/grinder with a 50 grit disc. This is a dusty, hot, backbreaking job and one of the pitfalls of boat building. I hate sanding but it must be completed if I want a fair and uniform interior hull on the boat. And to make matters worse it was 92 degrees today but fortunately we didn’t have too much humidity. Once I finished this job it was time for a shower, an adult beverage and a nap.  After dinner I started to fill all the crevices, screw holes and uneven strips with my epoxy sanding dust mixture. On and off over the next 23 days I continued to sand and fill those spots that were uneven in the hull. Once all the crevices were filled I applied a sealer coat of epoxy to the entire hull. The sealer coat does several things; first it fills the grain on all the wood in the hull and second it acts as a sealer to prevent moisture entering the wood prior to the fiber glassing process.  Overall I used 112 oz. of resin and 56 oz. of hardener to complete the fairing/sealing process. After one month of sanding/epoxy filling I decided I needed a break so I started making the deck beams.   


Monday, July 1, 2013

June 2013


On June 9th I applied the 1st coat of Interlux 2000E Perfection primer to the hull.  Upon opening the primer I found that the solution was very heavy and needed to be stirred with my power stirring attachment that I have for my portable electric drill. Once I got this going the solution became more workable and I than transferred the required amount of resin to a separate container and then added the epoxy primer hardener to the resin. The ratio was 3 parts of resin to 1 part hardener. The 1st coat went on extremely well but I made one mistake, I used a 4 inch foam roller and the roller melted after I finished one side of the hull. I then switched to a mohair roller and that worked great. The primer’s instructions did not include what type of solvent to use for cleanup so I used the trial and error method and found that Xylo worked the best. As with all solvent based rags I separated all of them and let them dry while hanging around the job overnight. There was no way that the roller could be saved so I let it dry also. I than let the epoxy primer sit for 2 days and then I applied the 2nd and final coat of primer. The result was a hard smooth hull.


Today, June 16, 2013 I started making the reverse molds that will hold the boat once it is turned over. After some staring at the boat and thinking what would make sense I concluded that I’d have a reverse mold at stations 2, 5, 8 and 11. Each of these molds has about 46 inches between them and I thought that 4 inches would be a good height for the molds above the base or keel. Fortunately I had kept the plywood patterns for the inside station molds and I therefore just needed to lay these lines out on some ¾ inch plywood and cut out the reverse molds. The molds are a bit off but I’ll fill the gaps, add 2x4’s to each molds base line and then add old carpet to the inside edges. I wouldn’t want the boat’s hull to plain plywood as it needs a comfy seat.


May 2013


On May 5th I started to fiber glass the Port side of the hull. I spread out the fiber glass along the hull’s length with the top edge aligned with the keel line. I found that I needed to weight down the fiber glass so that it won’t slip off the hull but guess what, the weights slipped so I attached the fiber glass edge with yellow painter’s tape. The yellow tape is for gentle surfaces and doesn’t have as much sticky backing as the blue tape. Likewise I used squeeze clamps to maintain the fiber glass along the hull’s sheer. I then trimmed the fiber glass along the sheer’s edge to within 2 inches of the sheer. I found that I needed to use 60 “squirts “of the epoxy resin/hardener to completely fill the fiber glass. Out of curiosity I wanted to determine the amount of epoxy used and determined that 60 “squirts” of epoxy resin equals 60 oz. of resin or 3.75 quarts and 30 oz. of hardener or 1.875 quarts. Therefore based on these measurements it took 7.5 quarts of resin and 3.75 quarts of hardener to completely fiber glass the hull plus I used 32 feet of fiber glass. At the start of the fiber glassing I used 4” foam rollers but found that the rollers left too many little air bubbles so I stopped using the foam rollers and used one of those ‘throw away’ china bristle paint brushes. I found that the 4” brushes worked great as I was able to work the epoxy into the fiber glass weave and create both a completely absorbed and smooth finish.  Once the epoxy hardened I left the hull alone for 2 days. Then I removed the “epoxy blush” by lightly sanding the fiber glass and wiping it with denatured alcohol.  Then over the next few days I applied an additional coat of epoxy to the entire hull to both fill in any gaps and to even out the surface. To achieve a smooth epoxy coating on the hull I sanded it with 80 grit sandpaper on a five inch orbital sander. Over the course of 2 days it took 3.5 hours to sand the hull.


I decided that I would use Interlux paint as the final top coat for both the boat’s exterior hull and the interior of the boat. With this in mind, I contacted the technical advisors at Jamestown Distributors and asked them what type of primer I should use. After telling them about the boat’s construction they suggested that I use Interlux 2000E Perfection for the primer. Well, this is a 2 part epoxy primer with a large amount of microballons in the paint with a strong solvent based smell.  Wearing my carbon filter respirator was required and I didn’t smell anything during the whole process.

April 2013


This month I sanded both the port and starboard sides of the hull to smooth out the hull’s contour and to make a fair curve from the garboard to the sheer and from the stem to the stern. As I sanded the hull I found that there were hollow areas that needed to be faired with additional epoxy and filler.  As my microballon canister started to get empty and I looked into the amount of additional micro-balloons I would need to order, I wondered if there was a less costly alternative to West System microballon.  I consequently started to experiment with sawdust but found that sawdust was very course and hard to sand. Then one day I happened to be at my local sawmill and found that they had a 25 inch stationary sander that exhausted the sanding dust into a separate bin. Consequently I now had about 3 gallons of stationary sander dust/fibers that worked great as an epoxy filler and I started using these to fair out the hollows in the boat’s hull.  I spent a total of 9 hours fairing out the hull. Once the fairing process was completed it was time to order the fiber glass, epoxy resin and hardener. I ordered 25 yards of 6 oz. fiber glass, 4.35 gallons of West System 105 resin and 1 gallon of West System 206 C slow hardener and a West System 300 mini pump set. My reasoning was that I would have sufficient fiber glass and epoxy to complete the exterior and interior of the boat and take advantage of Jamestown Distributor’s pricing and free shipping.


March 2013


I’ve started again! Temperature was up to 50 today and time to get out the Tyvek suit and the old sander/grinder. With a 60 grit sanding disc backed by a rubber flexible plate this is a mean piece of equipment. It’s great for leveling and truing the boat’s surface. Coupled with my electric planer I was able to sand and plane the starboard side. Upon doing this I found various spots that needed additional epoxy and I applied that on Monday April 1st.  Applied the epoxy and filled the gaps and holes that showed.  Based on the number of sanding discs that I would need to completely sand the boat’s hull I decided to order my sanding discs and sandpaper from a wholesale company that I use for my woodworking business. The company is Supergrit Abrasives Red Hill Corp. , www.supergrit.com in Gettysburg, Pa.


September - November 2012

I continued to add strips each week and to fill in all voids with thickened epoxy. When the ‘football’ got to within 8 inches of the keelson I found that I needed change the dimensions of the strips. I therefore switched to strips that were ½ inch wide and a height of ¾ inch. My rational was that I wanted the garboard planking to have a finished thickness of ½ an inch which is similar to the ½ plywood that is specified in the plans. Inserting the final strips takes careful cutting and splicing to get the tightest fit possible. All 88 of the strips were installed by October 31st. At this point I have spent $1,298.97 and contributed 170 hours to the boat’s construction.


The weather is starting to change and it’s dark in the garage by 6 PM so my time to work on the boat is limited. Therefore I am applying thickened epoxy to all seams that show any ‘light’ and to start the leveling process of the hull. By November 12th I have suspended work on the boat until the beginning of spring, which comes to our area in March.

July - August 2012


While attaching the keelson to the stem I found that I needed to make an adjustment to the stem. Since I had installed the stem into station mold # 2 and the keelson sat on top of the station molds I needed to add 3 additional 1/8 strips to the stem. Once these strips were glued in place with gorilla glue I could begin shaping the stem. What a job; the temperature outside was in the 90’s. I started with my trusty spokeshave but found that the white oak was so hard and fibrous that the best tool for the job was my 7 inch sanding disc sander. I used 50 and 60 grit discs and this accomplished this task in short order.

            In preparation for attaching the strips to the mold I applied gorilla duct tape to the edges of each station mold. On August 19th I installed the first strips to the mold, one on each side. I attached all the consequent strips with #6 1 inch hex head spatx screws. I started to use gorilla glue to edge glue each strip to the next and this worked great until I reached the bilge or curvature of the hull. Once I started making the compound bends to the strips the gorilla glue did not work and I needed to start using epoxy to edge glue the strips together. So here’s the process that I used:

·       For the strips to make a compound bend I found that this worked best if I soaked the strips overnight. I therefore joined 2 eight foot pieces of 4 inch PVC pipe together to make a sixteen foot soaking tube. Each strip was about 10-12 feet long and therefore needed to be scarfed to make the 17 foot strips required to fit the boat mold.

·       If you have ever tried to scarf wet wood you will find that it doesn’t work. I therefore scarfed the ends of the long strips prior to soaking and also made 5 foot strips with scarfed ends that were also soaked overnight.

·       On pulling a soaked strip out of the soaking tube I attached the strip to the mold with the #6 screws and scarfed each strip in place with gorilla glue. I then let the strips dry which took about a day.

·       Once the strips were dry I than lightly loosened each strip for the mold, applied epoxy to the edges and tightened the strips back to the mold.


·       As I added more and more strips to the molds, I found that some of the epoxied edges would ‘open’ due to the drying of the wood so I applied more thickened epoxy to the edges/seams of these strips.

May - June 2012


Now starts the boat’s actual building process. I have decided that I’m going to strip build this boat with cypress that will be edge glued. Many builders like to use the canoe cove and bead process but I found that it’s an extra step that really isn’t necessary. Edge gluing the strips works great as long as each strip is secured to each station mold and has additional clamps to assist as needed. The cypress strips are 5/16 inches by 1 inch wide. My lumber is in various lengths of 10 – 12 feet so I’ll need to scarf these strips. To assist in the scarfing process I built an eight to one scarf jig that fit on my mobile stationary disc sander. This worked really well and aided in the scarfing process. All of my cypress lumber was rough cut and needed to be planed prior to cutting the strips. After the planing was completed I jointed one edge of each board to acquire a true edge. Then I made a ‘run out ‘sled for my table saw and ripped the 5/16 inch strips. This can be a tedious process so to prevent any machine errors; I only cut 18 strips at a time. Of course my shop buddy Gunther, our standard poodle was on hand for moral support.


Once the strip situation was solved it was time to think about building the transom. I purchased a piece of mahogany with these dimensions; 5/4 x 7.5 x 13ft. @ a cost of $6.95 per board foot or $88.88. I then cut the board in half and edge glued the two pieces together with epoxy to form the transom. On cutting out the transom, sanding the surfaces and edges I took a suggestion from one of the other Melonseed builders and fiber glassed the inside surface of the transom for added strength. The difficult part of the transom was cutting the beveled top edge to meet that profile of station mold # 12. So I measured and then measured again and went ahead and cut the bevel. As it turned out the bevel was perfect on the sides but a bit short on the lower area of the transom, so I decided to just fill these areas with thickened epoxy as I went through the building process. The next step was to place, level and attach the transom to the boat mold. I thus made several supports to align the transom to station mold # 12 and to conform to the sheer of the boat.


Begin an old fashioned builder type I than went ahead and started building a keelson for the boat. The plans called for a ½ inch piece of plywood to be attached to both the transom and that of the stem, thus stabilizing the boat molds. Not wanting to use plywood I purchased a piece of clear white pine with the dimensions of 4/4 x 11 x 12 feet for $16. Then I made a 4/4 x 2 x 14 foot keelson to join the transom and the stem. To attach the keelson to each station mold I glued small 2 x 2 x 4 inch blocks to each station mold and attached the keelson to these blocks with ¼ inch carriage bolts. I guess some of my building friends would say that this was ‘overkill’ but I must tell you the building form was extremely ridged and completely aligned on all angles.

April 2012


Now it was time to make sure that the station molds created a “fair line” for the boat and that the sheer had a nice fair line. Although each station mold was created from the plan’s drawings, I found a number of ‘hollow’ spots in the station molds. I believe part of the problem came from adding the additional 3 inches to each station mold and I didn’t have a ‘fair curve’ at the sheer with the additional 3 inches. Therefore I had to determine; “was I going to add the 3 inches to the stem or the transom”. I decided I’d add the 3 inches onto the transom and therefore assumed that the overall hull’s shape would ride better in the water with a fuller stern. Using the new transom sheer line as a reference I created a fuller aft and center for the hull and kept a fine entry on the stem. Now I determined a new sheer line for the starboard side of the boat. This entailed adding and subtracting shims on the side of the each station mold. I used the starboard side as a reference and then transferred these measurements to the port side of the boat. At last I had a fair sheered boat! Now the task of making sure that each station mold did not have any ‘hollow’ spots. I did this with battens placed both diagonally and lengthwise on the boat’s hull. After a few shims were added to the station molds the boat’s shape received my final approval.  At this point I have invested 73 hours in the construction.
 

March 2012


Wouldn’t you know it we had several weeks at the beginning of March that were mild enough to start placing the molds on the ladder back frame. My fellow boat builder friends; Bud and Ben came over one day and we temporarily placed all the molds on the ladder-back. We attached 2x4x 48 lengths of lumber to the edge of the mold that met the ladder back. Once these were attached we attached them to the ladder back with 3 inch screws. You know, all the books make is sound so easy to place the molds on the ladder-back and instantly they’ll be aligned both laterally and horizontally. Well, that didn’t happen in this case! It’s a real job to make sure that each form is aligned to the center line. We needed to use a shim here and there but we did it. All the molds were in place and the stem was attached to the 1st and 2nd station mold. At this point I had spent 57 hours working on the boat and spent $866.20.

February 2012


The next step was to build the stem’s mold. I followed the plans and built a plywood form to bend the stem. For a uniform bend I have found that you need many, many clamps and since I didn’t have sufficient clamps, I made clamps using two 5/16 x 6 inch eye bolts for clamps. Here’s what I did: I drilled 1” inch diameter holes in the bending form and then used ¾ dowels that went through the ‘eyes’ of the bolts and attached a short length on wood to the top to form a U bolt type configuration. These bolt clamps work extremely well as they don’t leave a ‘cupped’ area in the middle of a piece of wood like a C clamp does.

To make the stem I purchased a white oak board that measured 2x6x60 and ripped the oak into 17 1/8 strips. The white oak board cost $37. As you may know, white oak bends extremely well but it needs to be soaked in water prior to bending. I then soaked 8 strips in water for 3 days and bent them around the form. I found that the white oak bent easily without having to steam the wood. The downside of water soaking the wood is that it took a long time to dry; particularly in March. So to speed the process I decided to glue the strips together with Gorilla Glue. The moisture content in the wood aided the polyurethane glue to form a tight bond and formed an interior stem that had little if any spring back.


January 2012


Over the New Year’s weekend I started cutting out the boat’s permanent molds to the lines drawn on each mold from the ¼ luan plywood. This was quite a process balancing the 4x8 sheets of plywood in my workshop and then cutting them out with my jigsaw. I soon found out that a standard ‘up cut’ jigsaw blade doesn’t lend itself to a clean cut line.  The plywood splintered terribly so I changed to a ‘down cut’ jigsaw blade. Using this type of blade is harder to start but the end result is much better to work with, all the splintered edges are on the inside of the mold. I was able to make a jigsaw cut to 1/8 of an inch from the ‘traced line’.  By the end of January all the molds were cut and sanded to their individual mold lines. The sanding was challenging and I found the best solution was to build a mobile stationary disc sander from some parts I had hanging around my shop. It is important that the surface be square to the sides of the mold. While taking a break from all the sanding, I thought a change of pace was in order, so I built the 16 foot mold ladder back. On completing for ladder-back I found that it was quite unwieldy and decided that I would make legs for the mold with 6 inch wheels. This worked great.

January 2011


The first thing I did was label the plans per the one page list of instructions.  After reading other boat plans, schedules, lofting requirements, tables of offsets, etc., I found that the labeling process is very helpful in understanding how the boat is put together. I than started a “Cut List” to determine how much lumber I would need and the type of lumber that I would need. I quickly found out that this wasn’t the place to start. There are so many pieces of various wood types and lengths that it’s hard to get a realistic list together. So I decided to make a model of the boat to the scale of 1 inch to the foot. Here’s the sequence of events that followed for the building of the Melonseeds hull.